
As you may have noticed, we're big fans of self-hosting here at BitLaunch. We've previously covered the hosting of communications platforms, email, and Plex servers, so now it's time to talk about how to create an Etherpad server.
What is Etherpad?
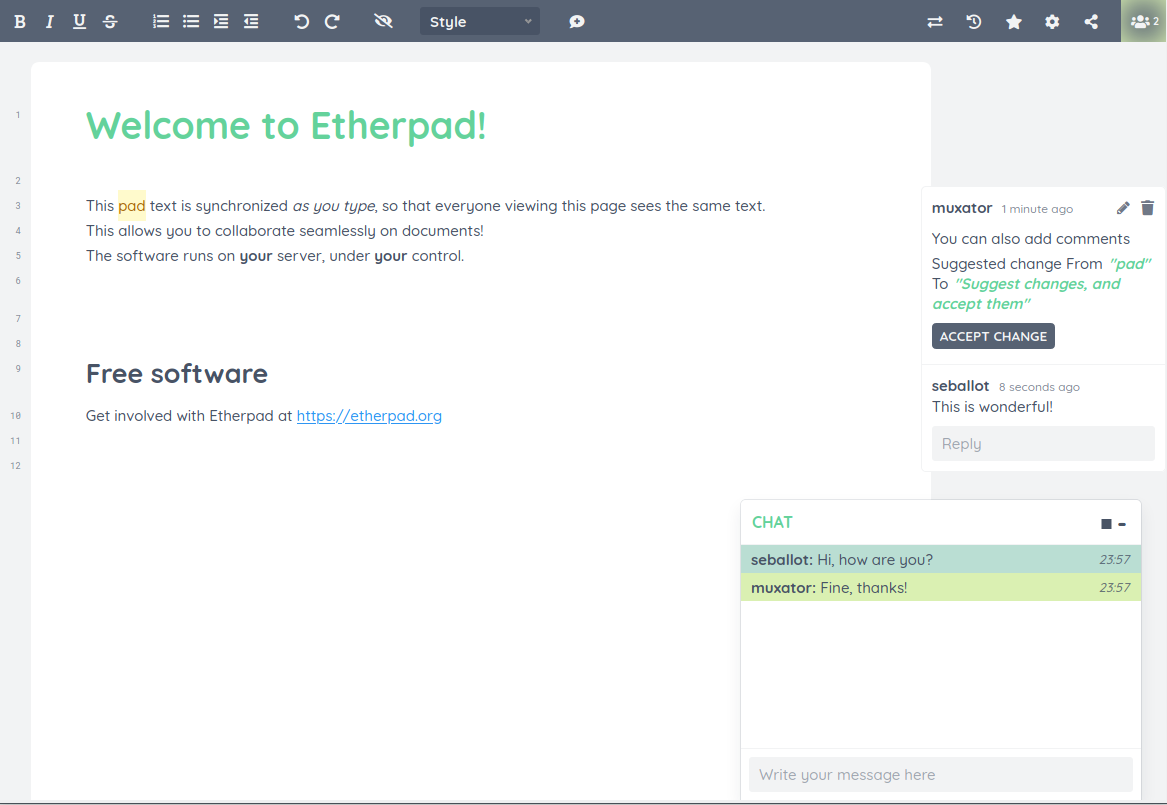
Etherpad is a free, open-source and self-hosted online document collaboration platform. In many ways, it's similar to Google Docs, but cuts out the invasive analytics and data sharing.
As well as word processing, though, Etherpad integrates text and video chat for easy communication while collaborating. It also supports numerous third-party plugins which extend its functionality, from in-line voting to translations and whiteboard functionality.
Pre-requisites
We'll be walking you through the setup of Etherpad Lite today, a completely re-written, JavaScript-based version which runs quite efficiently while maintaining all functionality.
As a result, you don't necessarily need a high spec server to run an instance. Our 1 GB/1 CPU anonymous vps servers will be enough for a couple of collaborators, and a 4 GB/ 2 CPU should be plenty for a small team. As with any application, though, the resources you require will vary significantly from use case to use case. Differences in team numbers, numbers of edits, and image/video use will cause major differences. Our recommendation? Start out at a reasonable specification and upgrade your server if you need to.
Other than that, all you need to get started is your VPS password and a tool to connect to it, such as PuTTy.
How to quick install Etherpad on Ubuntu 20.04
Etherpad Lite is incredibly quick and easy to install. To get started, just run the following commands, one after the other:
sudo apt-get update -y
curl -sL <https://deb.nodesource.com/setup_14.x> | sudo -E bash -
sudo apt install -y nodejs
git clone --branch master <https://github.com/ether/etherpad-lite.git> && cd etherpad-lite && src/bin/run.sh
If you're on your root user at this point, you'll receive a warning. We strongly recommend that you heed that warning and create a separate, non-root user for your Etherpad install (adduser --home /opt/etherpad --shell /bin/bash etherpad and install -d -m 755 -o etherpad -g etherpad /opt/etherpad).
You can read more on the dangers of logging as root here.
Etherpad will take a little while to add packages and then it will start. You can check that Etherpad is running by typing your.server.ip:9001 in the URL bar of your local browser.
Configuring Etherpad
Your Etherpad is working, but we still have some configuration to do to ensure it's both functional and secure.
You can configure your Etherpad by running nano ~/etherpad-lite/settings.json on your non-root, Etherpad user.
Under Default Pad behavior you'll find settings relating to your features and other interface elements:
"padOptions": {
    "noColors":         false,
    "showControls":     true,
    "showChat":         true,
    "showLineNumbers":  true,
    "useMonospaceFont": false,
    "userName":         false,
    "userColor":        false,
    "rtl":              false,
    "alwaysShowChat":   false,
    "chatAndUsers":     false,
    "lang":             "en-gb"
  },
You can change any of these to true or false to enable/disable default pad behavior.
You'll may also want to require authentication for all users via the following:
"requireAuthentication":true,
However, its highly advised that you enable hashing if you do so to avoid storing passwords in plaintext. To do so, you should install and configure the ep_hash_auth plugin.
To prepare for the next step, you'll want to delete the "dirty" development database by pressing Ctrl +W, searching for dirty, and deleting the following lines:
"dbType" : "dirty",
"dbSettings" : {
                  "filename" : "var/dirty.db"
                },
You'll then want to look for the line that starts with An Example of MySQL configuration and modify it so it looks likes this:
"dbType" : "mysql",
"dbSettings" : {
"user":     "etherpaduser",
"host":     "localhost",
"port":     3306,
"password": "yoursecurepassword",
"database": "etherpad",
"charset":  "utf8mb4"
Switch yoursecurepassword for a secure, unqiue password, and note it down for later.
Now search for trustProxy using Ctrl + W and change the line to true. Finally, search for changeme and change the password of the admin user to something secure.
Creating a MaraDB database
Currently, your Etherpad instance is running on a "dirtyDB" database driver which will not scale well and is only meant for testing purposes. To maintain performance and security, we need to set up a MariaDB mySQL database for Etherpad. Thankfully, this is quite simple.
First, install MariaDB on your non-etherpad user with:
exit
apt-get install mariadb-server -y
Once it's installed, run sudo mysql_secure_installation and follow the prompts to set up your security. .
Now we can now login to the MariaDB shell with mysql -u root -p and create our etherpad database:
create database etherpad;
Add your database user, replacing pass with the mySQL password you added to your config file earlier:
grant all privileges on etherpad.* to etherpaduser@localhost identified by 'password';
Flush the privileges and exit:
flush privileges;
exit;
Login to your Etherpad user, cd into the etherpad lite directory, and start your server to check if everything is working:
su - etherpad
cd etherpad-lite
src/bin/run.sh
Making a Systemd service file
For easy management and automatic startup, we can make a quick systemd service file. First, exit from the Etherpad user, then run:
nano /etc/systemd/system/etherpad.service
Paste the following into your service file:
Unit]
Description=Etherpad-lite
After=syslog.target network.target

[Service]
Type=simple
User=etherpad
Group=etherpad
WorkingDirectory=/opt/etherpad/etherpad-lite
Environment=NODE_ENV=production

ExecStart=/usr/bin/node /opt/etherpad/etherpad-lite/src/node/server.js

Restart=always

[Install]
WantedBy=multi-user.target
Press Ctrl + O to save and Ctrl + X to exit. Then start etherpad and allow it start automatically on boot:
systemctl daemon-reload
systemctl start etherpad
systemctl enable etherpad
Check etherpad is running with systemctl status etherpad, and then check the site itself by typing your.server.ip:9001 in your local browser.
Nginx reverse proxy
To access your Etherpad easily via a URL, you'll want to set up an Nginx reverse proxy. Of course, you'll need Nginx for this:
apt-get install nginx -y
With that installed, set up a virtual host config and add the following to it, modifying [yourdomainname.info](<http://yourdomainname.info>) to the domain pointed to your BitLaunch server.
nano /etc/nginx/sites-available/etherpad.conf
upstream etherpad {
   server localhost:9001;
   keepalive 32;
}

server {
   listen 80;
   server_name etherpad.yourdomainname.info;
   location / {
       client_max_body_size 50M;
       proxy_set_header X-Real-IP $remote_addr;
       proxy_http_version 1.1;
       proxy_pass <http://etherpad>;
   }
}
Activate the virtual host with ln -s /etc/nginx/sites-available/etherpad.conf /etc/nginx/sites-enabled and check for any errors using nginx -t.
Restart nginx (systemctl restart nginx) and visit the domain in your browser to verify everything is working as it should.
Generate your SSL certificate with certbot
For additional security, you should enable TLS on your domain. The EFF's cerbot tool makes this very easy:
sudo apt install certbot python3-certbot-nginx
sudo certbot --nginx -d yourdomainname.info -d www.yourdomainname.info
Naturally, you should replace [yourdomainname.info](<http://yourdomainname.info>) with your actual domain name. If all goes well, you should get the message: Congratulations! Your certificate and chain have been saved at:. You can now try reloading your website in https.