An anonymous VPS can do a lot for your privacy, whether you're blogging about something controversial, providing a service that's typically frowned upon, or are just a private person. However, the privacy of your server is directly linked to its security – if an unauthorized party gains access, they may be able to extract any personally identifying information you've left behind.
If you haven't already, Sign up for BitLaunch here to quickly create an anonymous VPS.
At BitLaunch, we put a lot of work into making our servers secure, but there are also some steps you can take to ensure your anonymous VPS remains just that. In most cases, these changes take only a few minutes but could save you from major headaches down the line.
Keep Your Anonymous VPS Updated
It almost goes without saying, but keeping your server updated is vital for maintaining its safety over time. The security landscape is ever-evolving and new threats and vulnerabilities emerge. Whether it's a critical vulnerability or a minor software one, keeping up with the latest security patches will give you the best possible chance at survival. In many cases, vulnerabilities are patched before they even become public, so frequent updates ensure your system is safe before they're announced, instead of after attackers already know about them.
The exact method to update and deploy security patches will depend on your distribution. Ubuntu users, for example, should get in the habit of running sudo apt update and sudo apt upgrade whenever they SSH into their VPS, followed by sudo reboot to apply any kernel updates. Generally, you should make sure updates don't have any serious reported issues before applying them.
If you don't log in to your system regularly, automatic security updates can be a good idea. In Ubuntu 20.04, you can enable automatic updates via unattended upgrades:
sudo apt-get install unattended-upgrades
sudo dpkg-reconfigure --priority=low unattended-upgrades
You can then run through the interactive installer to configure your options. For CentOS, you should be using yum-cron.
However, it's worth noting that whatever your distribution, automatic updates can have disadvantages. As the system does not automatically restart, users may assume they're safe when in reality kernel updates have not been applied. They can also lead to downtime of services, which can cause problems if you rely on them 24/7. Finally, some packages can have bugs and you won't be able to vet them before they're installed. As a result, it's often best to limit automatic updates to security ones.
Don't Log In as Root
The default user given to BitLaunch customers is root, giving you the privileges required to configure your server to your heart's content. However, it's good security practice to create a limited account that has to ask for permission via sudo to do any administrative tasks. You should then use that account each time you use your anonymous VPS.
In Ubuntu, type:
adduser limited_user
Enter a secure, unique password, then type add user limited_user sudo to add it to the administrator group.
In CentOS, you can perform the same functions with the commands:
useradd limited_user && passwd limited_user
usermod -aG wheel example_user
Type exit on either distribution to log out after creating the user, then replace root with the new user in your SSH client.
Keep your SSH Access Secure with an SSH Key
You'll have noticed that BitLaunch's anonymous VPS service uses a password for SSH connection by default for convenience's sake. However, we recommend the creation of an SSH key instead as they aren't sent to the server and their 4096 bit length makes brute force attacks all but impossible.
You can follow our previous guide to create an SSH key using the open-source PuTTy and follow the guide below to add it to your BitLaunch account.
Optimize your SSH daemon for security
After creating a limited account and testing your SSH key, it's a good idea to make some changes to the SSH daemon for further protection. Now that you have SSH key authentication set up, you can disable SSH password logins and root login by editing the /etc/ssh/sshd_config file with your favorite text editor:
cd /etc/ssh
nano sshd_config
Add the following line under # Authentication to turn off root login via SSH:
PermitRootLogin no
You can instead use sudo to run commands or su - root followed by the password from your limited user.
Under # To disable tunneled clear text passwords, change to no here!, modify the line to the following:
PasswordAuthentication yes
If you only use IPv4 or IPv6 to connect your SSH into your server, rather than both, you can also disable the one you don't use. Look for the #Port 22 comment and modify the line under it from AddressFamily any to:
AddressFamily inet for IPv4 only
OR
AddressFamily inet6 for IPv6 only.
You'll want to restart your SSH service with sudo systemctl restart sshd or sudo service sshd restart if you're on CentOS 6/Ubuntu 14.04.
Install and configure Fail2ban
To harden your SSH further, you should set up Fail2Ban to ban IP addresses from logging into your anonymous VPS after too many attempts. While other such tools exist, Fail2ban contains strong filters out of the box, which makes it ideal of beginners, but also offers strong flexibility in configuration.
The basic steps to get Fail2ban up and running are as follows:
- Update your VPS
- Install Fail2ban:
sudo apt install -y fail2ban - Enable boot persistence:
systemctl enable fail2ban - Start the fail2ban service:
systemctl start fail2ban
For a more in-depth setup, including testing, whitelisting, and demonstration, check our article below.
Configure Your Firewall
Though attackers these days have the ability to get around a firewall, they present another barrier to access, preventing network mapping and acting in combination with the other techniques we mentioned to prevent intrusions.
A properly configured firewall will only allow the traffic necessary for your anonymous VPS' operation, denying everything else. In most Linux distributions, this can be achieved via the use of Iptables. FirewallID is used for iptables configuration on CentOS/Fedora, while UFW is used for Debian and Ubuntu for easier management.
In Windows 10, there's the built-in Firewall application, which does a lot of the heavy lifting for you automatically. You may, howvever, want to make some adjustments so your server remains pingable.
Scrutinize Your Network Services
Your Linux distribution is likely running various network-facing services that you don't need. These can be removed to give an attacker fewer avenues for attack without affecting your operation.
You can type sudo ss -atpu to get a list of running network services:
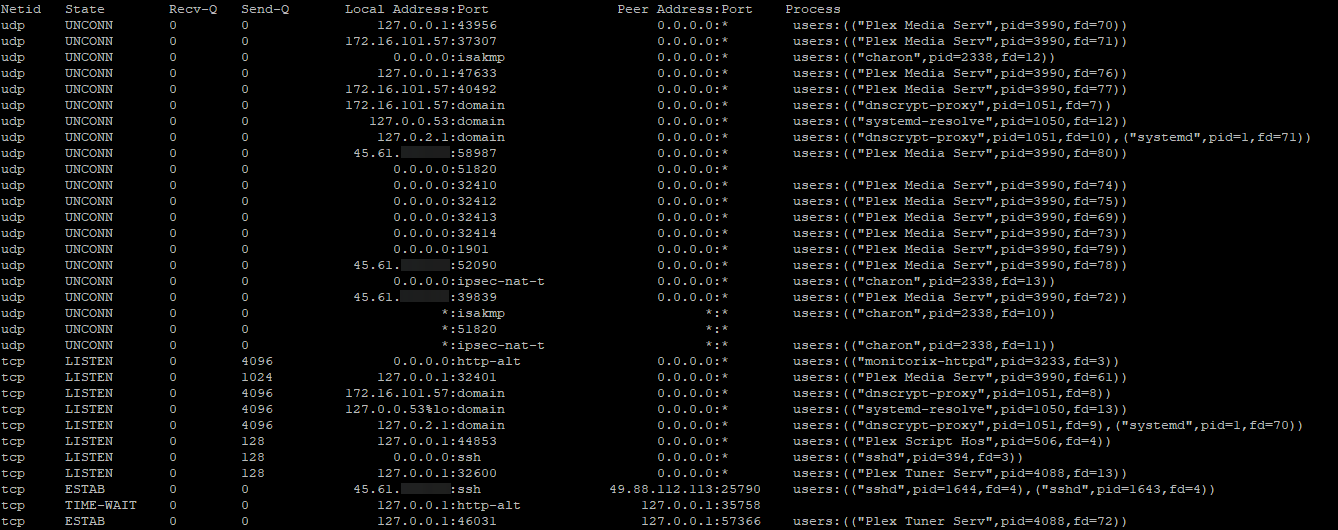
You should make sure you don't remove your SSH service (sshd), and also avoid the removal of system services like dnsmasq and systemd-resolved. They rarely listen outside of localhost anyway. You should remove services that you're no longer using, though.
In our case, some of our Plex Media Server services further down are listening for any incoming IP address on any port (*:*). We're no longer using the VPS as a media server, so we can remove the listening service with:
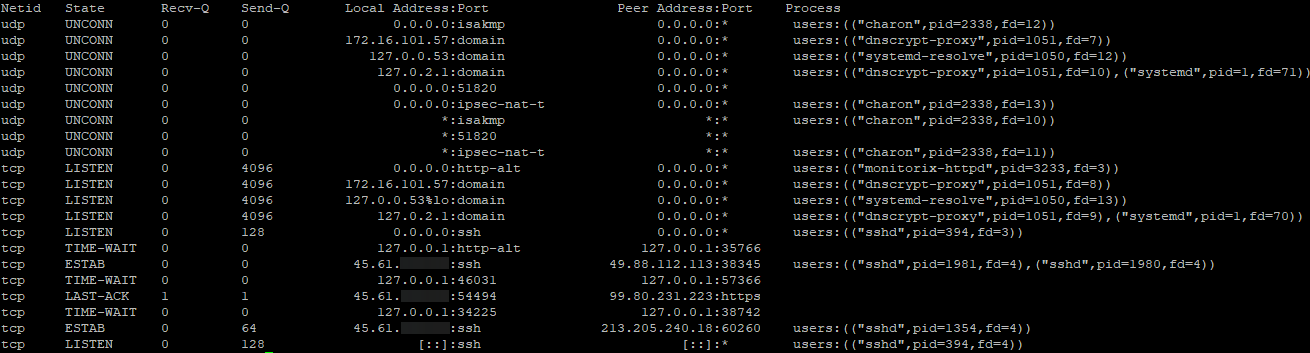
sudo apt purge plexmediaserver
We can then check our services with sudo ss -atpu again to verify the removal:
It's also a good idea to check in on your network performance and traffic every now and then. Netstat and Tcpdump are two Linux command-line tools that may help you notice a DDoS or other attack. On Windows, a tool like Wireshark can be beneficial.
The Best Command Line Tools for Linux Performance Monitoring
Change your RDP port
Those using a Windows 10 VPS will cut out a lot of automated attacks if they change their RDP port. The port 3389, is known by every attacker and their bots will try to log in using it as a result. While a good, strong password or an SSH key will offer much more protection, every automated attack still increases the chance of a breach.
A simple way to change RDP port is via the Registry Editor, Windows one-stop shop for advanced configuration changes. You'll want to navigate to the \Terminal Server\WinStations\RDP-Tcp key and edit the PortNumber DWORD to the value of your choice.
Check your authentication logs
Despite your best efforts, breaches may still occur from time to time. It's difficult to account for every variable, such as a rouge employee or security flaws in applications or plugins you're using. As a result, it's useful to check your authentication logs regularly and when you notice suspicious activity.
Authentication logs provide a robust overview of every attempted SSH login and sudo request, as well as the IP address of each successful login. This can be utilized to both spot attacks and figure out what an attacker has changed after the fact.
How to view authentication logs on Ubuntu 20.04
Conclusion
Performing the basic steps above will significantly improve the security of your anonymous VPS, but you may want to harden it further depending on your use case with intrusion detection software, by modifying the permissions of certain files, and more.
We also recommend that you enable two-factor authentication for your BitLaunch account and regularly check the account history for suspicious logins. More generally, developing a security-first mindset for everything you do on your server will ensure you don't trade safety for convenience. So update any passwords regularly and keep an eye on the latest security news.
Need a VPS provider that cares about protecting you? Sign up for BitLaunch here.