
If you're used to a UI-based workflow, being suddenly confronted with a VPS server's black screen filled with commands can be intimidating. Of course, we do recommend that you stick it out – you'll soon realize that the command line isn't just useful in hacker movies.
However, there are some tasks where using a GUI just makes sense (good luck editing images in the command line, for example). We're going to show you how to install a GUI on your Ubuntu VPS so that you can get back to familiar functioning.
A note on BitLaunch server options
Before we start with the guide, it's worth mentioning that BitLaunch already offers servers that come with a pre-installed GUI. You'll see the option displayed as "Ubuntu Desktop" when you launch a server in your control panel.
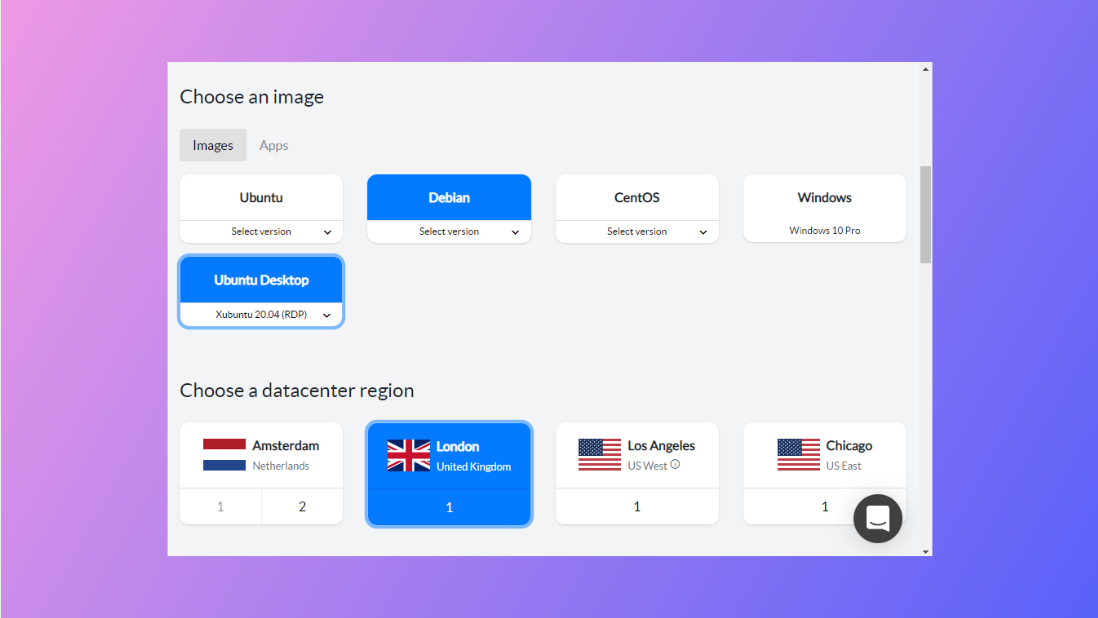
This is ideal if you have not made much progress on your server yet, as you won't be able to upgrade existing servers from a non-GUI plan to a GUI one.
How to install a GUI on an Ubuntu server
The first thing to understand before starting on this journey is that servers aren't typically bundled with a GUI for a reason. GUIs require a lot more processing power to perform the same tasks as a command line, and they can introduce new routes for the security of your server to be compromised (you can't click a phishing link if you can't see it).
If you decide to go down this route anyway, make sure you have a server that is at the very least 2GB/2CPU, preferably 4 or higher. The resources you need will vary quite a bit depending on the choice of GUI and the resolution you are running at.
Getting started
Before we do anything else, it's a good idea to update your packages. This will ensure you get the latest, most stable version of the desktop environment you choose to install. To do so, run:
sudo apt update && sudo apt upgrade
It may take a couple of minutes for the process to complete.
With that done, you will want to decide which GUI to install. Some choices include:
- GNOME: used by default in Ubuntu desktop. Stable and pretty with a lot of features, but is more resource intensive than the other options here.
- KDE Plasma: Simple, lightweight, easy to use, and visually appealing, with a high degree of customization.
- MATE: Very lightweight and time-tested, with a Windows-like design.
- Xfce: Perhaps even more lightweight than MATE, though it's graphics tend to be less flashy, it is a great choice for VPS servers where that does not matter as much.
Installing GNOME on an Ubuntu Server
Installing GNOME on an Ubuntu server is very easy - we can just install Ubuntu desktop:
sudo apt install ubuntu-desktop
This process will take a little while and may require you to provide user input occasionally. Once it finishes, however, you'll have everything you need and can continue to the next section.
Installing KDE Plasma on Ubuntu Server
You can install KDE Plasma through the command line in much the same way as GNOME:
sudo apt install kde-plasma-desktop
You can continue to display manager setup once the process is complete.
Installing MATE on Ubuntu Server
The command to install MATE on your Ubuntu desktop server is:
sudo apt install ubuntu-mate-core -y
Installing Xfce on Ubuntu Server
You have two choices when it comes to installing Xfce - the base install and Xubuntu. Xbuntu contains additional packages and customizations to make Xfce more rich, but may come with a small hit to performance and will use more storgae space.
To install just Xfce, run:
sudo apt install xfce4 slim -y
Or, to install Xubuntu, use:
sudo apt install xubuntu-core -y
Choosing your display manager
Display managers, as you might expect, manage the graphics of a desktop environment. There are various choices, with some better suited to certain desktops than others, as well as having feature and performance differences.
The best and most lightweight options are SliM, followed by LightDM. Choose either and install them with one of these commands:
sudo apt install slim -y
sudo apt install lightdm -y
If you already have a display manager installed, such as the less performant SSDM, you'll get the option to choose which one you want as your default.
Using your GUI with xRDP
You may have noticed after installing your GUI and display manager that nothing has changed. While technically you can allow x11 forwarding via SSH and access the GUIs of your applications that way, in our opinion the best way to get a full desktop experience is via Microsoft's RDP protocol. While you can use VNC and have a good experience, RDP offers better security at the time of writing due to the maximum VNC password length of 8 characters.
You can install xrdp using:
sudo apt install xrdp
You'll may also need to add the xrdp user to the ssl-cert group so that xrdp can access the keyfile in /etc/ssl/private.
sudo adduser xrdp ssl-cert
After doing so, restart xrdp with sudo systemctl restart xrdp.
Firewall configuration
If you're running a firewall (which we highly recommend), you'll need to allow RDP traffic through it by opening the RDP port. This can be performed on an IP/IP range level or on a global level. The latter is not a good idea for security reasons, so we instead recommend you run the command:
sudo ufw allow from your.ip.address to any port 3389
Or, even better, only allow xRDP to communicate via localhost and set up an SSH tunnel.
Connecting to your server via xRDP
Now all that's left is to connect to your server and use your shiny new GUI. To do so, open an RDP client on your local PC (Remote Desktop Connection on Windows or Remmina on Linux ) and enter your server's IP address.
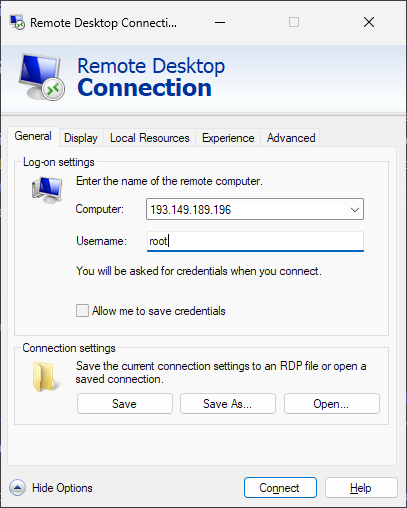
You will be asked to provide your credentials, after which point you should be able to see your desktop and use it as you would any other.
