

Blender is a powerful free and open-source 3D modeling and rendering software that is able to trade punches with the big industry players. But though the Blender Foundation has pumped a lot of resources into speeding up its render engines, the fact is simple: you'll need a decent GPU if you want to do anything quickly.
Unfortunately, not everybody can afford to drop thousands of dollars on hardware or slow their machine to a halt for days while they render an animation. The solution is, therefore, to render in the cloud using a GPU-powered server. Thanks to BitLaunch's recent addition of Vultr GPU VPSs, you can now do so on our service.
We'll walk you through how to render in Blender on an Ubuntu VPS and Windows VPS, both utilizing the Nvidia A40. With this GPU, you should not expect RTX 4090-level Cycles render speeds, but they will be relatively fast.
Additionally, large amounts of VRAM on our higher-spec servers should let you avoid those pesky "out of memory" errors. Of course, another major benefit is that you won't need to leave your local PC rendering 24/7 and will be free to do other tasks on it.
How to render a Blender scene on an Ubuntu server
Generally, you will get the best performance out of Blender if you render using the command line, as the GPU does not need to worry about using its resources to render a GUI, etc.
The first step is (naturally) to install Blender:
sudo apt install blender
Next, make a folder where you can store your .blend files. You can do so with:
mkdir blender
Now copy your blend files into this folder using SFTP, SCP, etc. Ensure your blend files are packed and have your desired sample count, etc.

Enter the folder you stored your blend files with cd blender and run your render command. We'll give a couple of examples of different render commands and what their arguments do below.
Rendering an image with Cycles
blender -b yourfile.blend -f 10 --cycles-device OPTIX
This renders in the background (-b ) the 10th frame only (-f 10 ) of a blend file named yourfile.blend using Cycles (-E CYCLES) render engine and the Nvidia Optix API (--cycles-device OPTIX). For context, OptiX is a real-time GPU-based ray tracing engine that can be used with RTX-powered Nvidia cards. It generally renders Cycles scenes 60% faster than CUDA, which is the other main option for Nvidia GPUs.
Rendering an animation with Cycles
blender -b yourfile.blend -E CYCLES -s 1 -e 50 -a --cycles-device OPTIX
Renders yourfile.blend in the background -b, using CYCLES as the render engine. The start frame is 1 (-s 1 ) and the end frame is 50 (-e 50). The -a option renders an animation and again --cycles-device OPTIX sets the render API.
You can utilize the start and end frame options to render your animation across several servers – for example, by rendering a 100-frame animation by rendering 10 frames on each server.
A note about headless rendering with EVEE
Evee does not currently support headless rendering. You can mess around with pyvirtualdisplay to set up a fake display output, but you're better off just using a GUI on Windows Server, as rending this way is slow anyway.
How to render a Blender scene on a Windows server
You can render via the command line or UI on our Windows servers because we provide RDP access. The commands are exactly the same as those shown above, so we'll just cover how to render via the GUI. If you've rendered anything on your own PC, you'll already know how this process works. However, you may still want to read on for some tips on render settings on VPS usage and tips on render settings for an A40.
The first step is naturally to install Blender from the official website.
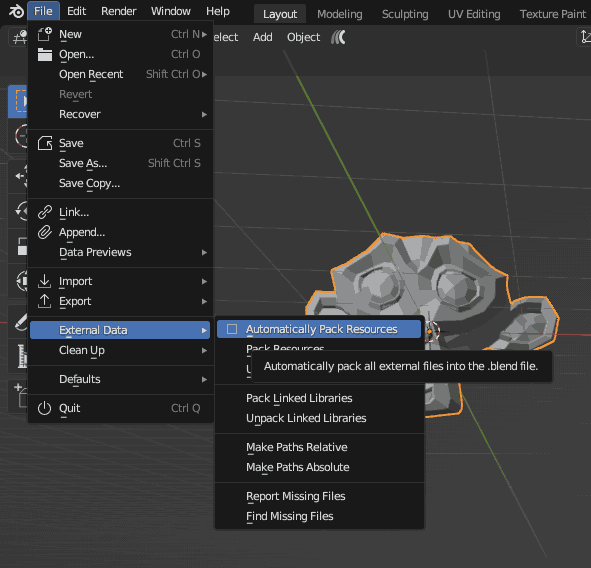
You will then want to pack your blend file on your local PC by pressing "File > External Data > Automatically Pack Resources" and then saving your file.
Now that it's packed, you can upload it to your server via SFTP, SCP, etc. If you're using BitLaunch, your SFTP details will look something like this:
- Protocol: SFTP - SSH File Transfer Protocol
- Host: Your VPS IP, such as 12.34.567.89
- Port: Use the default SFTP port of 22 or specify the custom port you set up earlier.
- Logon type: Interactive logon – enter your VPS username
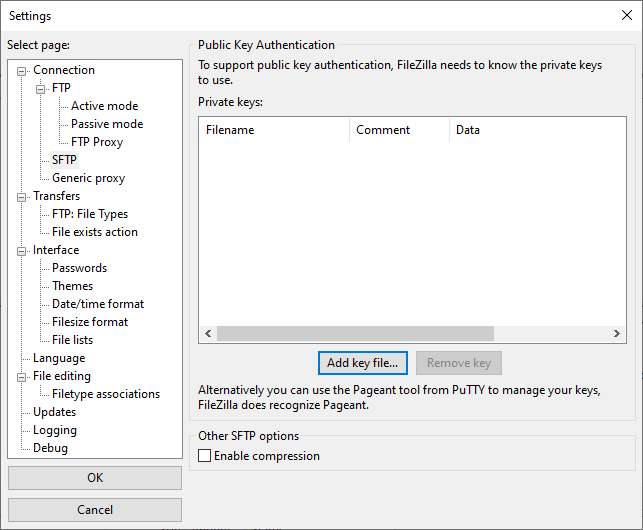
Of course, you can also add your SSH key in a program such as FileZilla via "File > Site Manager > SSH > Add key file...".
Rendering with Cycles
Once you have transferred your blend file, you can open it and render it. However, if you're using cycles, you'll want to ensure that your system preferences and render settings are correct for the fastest speeds.
In the "Edit > Preferences > System" screen, make sure you select Optix as your Cycles render device. This will allow you to use the hardware raytracing acceleration available on the A40.
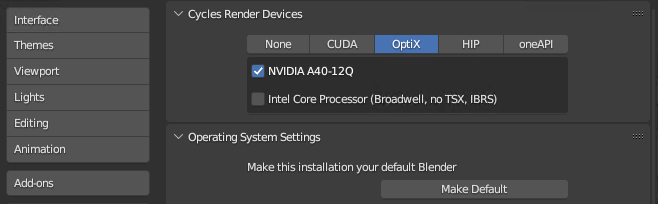
Enabling the use of the processor may also help speed up render times in some scenes, though this is situational. In our testing, rendering purely on the GPU produced faster speeds.
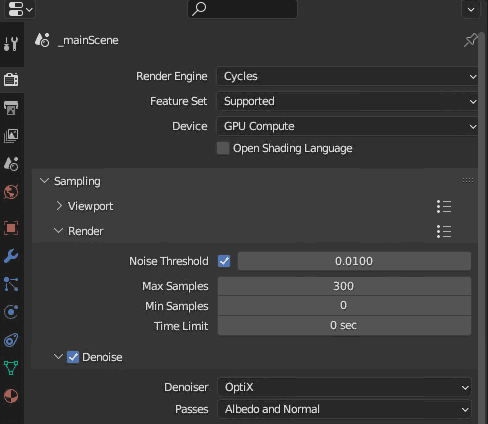
Make sure the device is set to GPU Compute in your render settings. You'll likely also want to enable denoising. Optix should be slightly faster at denoising at the expense of marginally less quality.
Finally, you can press F12 to render your image or Ctrl + F12 to render an animation.
Rendering with Eevee
With Evee, you can keep your system preferences exactly the same as those mentioned above. Other render settings are up to personal preference, with features such as ambient occlusion slowing down render times but creating a much more pleasing image.
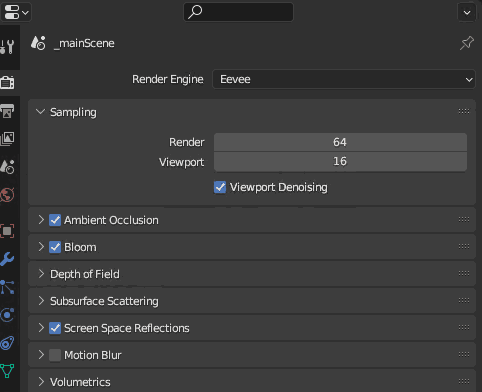
In Eevee, more samples will not have a large effect on the amount of noise in the image but will instead provide better rending of soft shadows, less aliasing, etc. If you are coming from a Cycles scene, you will probably have to remaster your lighting to suit Eevee to account for the lack of bounce lighting.
Closing words
If you're regularly rendering in the cloud, then there are steps you can take to speed the process up. This includes writing scripts to render frames across multiple servers and setting up automatic file syncing between your home PC and VPS. The above, however, should be all you need to know to start rendering Blender scenes remotely. To see if it's a good fit for you talk to our support team about some free credit.