

If you’re not used to the command line, finding a file in Linux can be a real pain point. You no longer have the visual feedback of a file manager, and instead must rely on knowing the correct Linux find command for the job. Thankfully, once you know what to type, the command line can be just as powerful, or more so, than a GUI. Moreover, the find command is present in all Unix-like systems, so you’ll only have to learn it once.
Today we’re going to teach you everything you need to know about this useful tool, including how to find a file in Linux, search sub-directories, delete, and filter by aspects like name and file type. First, though, you may want some pre-requisites:
- A Linux VPS or local Linux installation. We’ll be using Ubuntu 20.04 for this tutorial.
- A means of connecting to the VPS via SSH, such as PuTTy.
- Your VPS credentials, which can be found in your control panel.
 BitLaunch
How to Find a File in Linux by Name or Extension
As mentioned earlier, the method of finding files in Unix-like systems is quite universal and utilizes the Linux find command. Commonly, users need to find documents with a specific file type, such as a .txt. We can look for files that meet these criteria in a certain directory with:
find /home/username/ -name "*.txt"
Naturally, you’d replace ‘username’ with your user if you wanted to search in your home directory. Here, we’re asking the OS to look for files with the name ‘*’ (any file name), but are specifying that it has to be a .txt. Alternatively, we could look for .txt files in the active folder with:
find -name "*.txt"

But what if we want to find files in Linux that aren't in the top directory? After all, if you know the location of the file, it’s not too hard to find it anyway. This is when we must start to understand the general structure of the find command:
find <options> starting/location <expression> action
As you’d expect, it’s the options attribute that gives us control over how files are processed. The starting location defines where the find command will begin its search from, which can be useful for time-saving if we know the general location of a file, but not the subdirectory. The expression is made up of options that control the tests that are utilized to search the directory hierarchy. This may sound confusing at first, but it becomes clearer with a real-world example.
BitLaunch
Let’s say that I know I saved a .css file for my homepage in my WordPress folder somewhere, but I’m not sure exactly where or what I named it. I can type:
find -O3 -L /home/wordpress -name "*.css"

-L is to follow any symbolic links, while /home/wordpress starts the search in that directory, looking for files whose filename ends in .css. In this case, the find command uses the option -O3 change the optimization level, but the following options would have also been valid:
| Option | Description |
|---|---|
| -O | The equivalent of optimisation level 1 |
| -O1 | Default optimisation if nothing else is chosen. Expressions are ordered so that tests based on file names, like -name, are performed first. |
| -O2 | Performs -type tests after tests based on file names, then file-type. |
| -O3 | Full cost-based query optimiser. Tests that take little resources are performed first, and expensive ones later in the process. Also takes into account which predicates are likely to succeed. |
| -maxdepth X | Searches current directory and a specified level of directories deep. Useful for time/performance saving in large structures. |
| -iname | Search for a file without having to worry about case sensitivity |
| -type d | Search for directories |
| -type f | Search for files |
| -not | Show files that don’t match the test. |
Find Files in Linux based on Contents or Modification Time
In the situation that you don’t know the filename or have many files of same type, you can examine the contents of the files in a subdirectory for a phrase you recognize. You can use a Linux find text tool, such as grep, which will search file contents for a specific string:
find /home/wordpress -type f -exec grep "test" '{}' \; -print

“test” here can be replaced with the string you’re looking for, while /home/wordpress can be replaced with . to search all objects in the current directory hierarchy.

Read our full grep guide to learn how to customize your search further.
In UI-based file managers, you can sort by modification time, and the find command can work similarly. Let’s say that to narrow down results, I only want to view .css files that have been modified within a week:
find /home/wordpress/ -name "*css" -mtime -7

As my homepage.css was last modified more than 7 days ago, it no longer shows in the search results.
Find files in Linux and process or delete them
You may have noticed earlier our use of the -exec option, which runs commands against each object that matches the find expression. This is useful if we want to find all files or a filetype or with a particular string in their name or contents and modify them.
To use another real-world example, we’ll pretend that we want to modify file permissions for all files in the hierarchy named “test.conf”.
find . -name "test.conf" -exec chmod o+r '{}' \;
You can start to see how we can quickly perform actions on multiple files, though note that -exec executes commands in the root find directory. For specific directories, use -execdir.
We can quickly delete multiple files that match a criteria without -exec, though you should always make sure that you’re only finding the files you wish to delete by running it without the -delete option first.
Going back to our WordPress example, let’s delete all files in the WordPress folder with the .css file type, but leave everything else untouched:
find /home/wordpress/ -name "*.css"
find /home/worpess/ -name "*.css" -delete
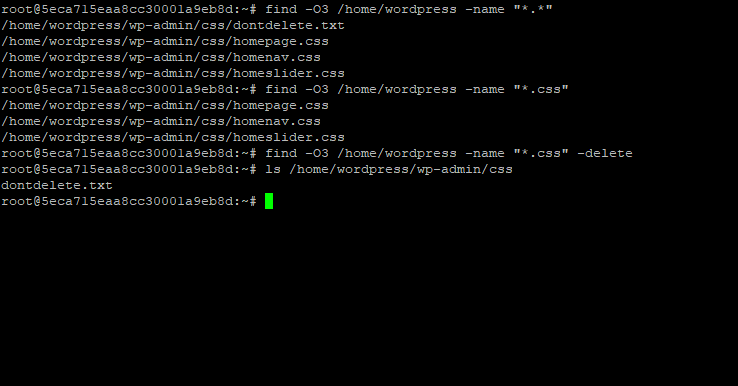
As you can see, the command deleted all .css files, but left “dontdelete.txt”. With this, you should now have a pretty good handle on how to find files in Linux and an idea of how powerful it can be. Just make sure to double-check all of your commands if you're running them in a live environment. You don't want to put a * in the wrong place and delete your entire database.
Need automatic backups to fix those Linux find command slip-ups? Sign up for BitLaunch today and get a free trial.