

Need a fast VPS server for a Bitcoin node? Sign up to BitLaunch today.
What is a Bitcoin node?
A node is a server or computer connected to other computers, with which it shares rules and information. In Bitcoin specifically, nodes are vital. They monitor the blockchain – an immutable list of transactions – and help to distinguish which transactions are genuine. They prevent, for example, somebody from spending bitcoins that they've already spent elsewhere.
Generally, there are two types of bitcoin node: a full node and a lightweight node. A full node holds the entire blockchain and fully validates transactions and blocks. A light node, or lightweight node can't function without the help of full nodes, storing only part of blockchain and only verifying transactions using a technology called simplified payment verification (SPV).
Running a Bitcoin node helps support the network and the future of the crypto currency. If you want to help Bitcoin grow, you can run your very own node, which helps to fully validate transactions and blocks. Many people and organizations volunteer to run Bitcoin nodes using spare computing and bandwidth resources—but more volunteers are needed to allow Bitcoin to continue to grow.
Usually we would need a VPS with enough space to hold the entire blockchain, but by enabling 'pruned mode', we can get a Ubuntu bitcoin node set up on a surprisingly small and cheap VPS. Pruned mode reduces the storage requirements by deleting a large portion of the information and replacing block data with index headers.
Note that it is not recommended to use this node as a personal wallet.
Requirements
The official bitcoin documentation states the following requirements for running a bitcoin node:
- 350 gigabytes of free disk space
- 2 gigabytes of memory (RAM)
- A broadband Internet connection with upload speeds of at least 400 kilobits (50 kilobytes) per second
- An unmetered connection or a connection with high upload limits
All of our supported hosts provide servers that meet these requirements. We can also save costs by reducing the amount of space required to store blockchain information by using what's called "pruned mode" as part of the bitcoin core software.
Step 1: Choosing a server
To match the necessary requirements, we're going to pick a server with good transfer and at least 2GB of RAM. When choosing how much space we will use to store blockchain information, we need to be sure that it is over 550MB, as that is the minumum required for pruning.
Head over to the server creation panel to begin.
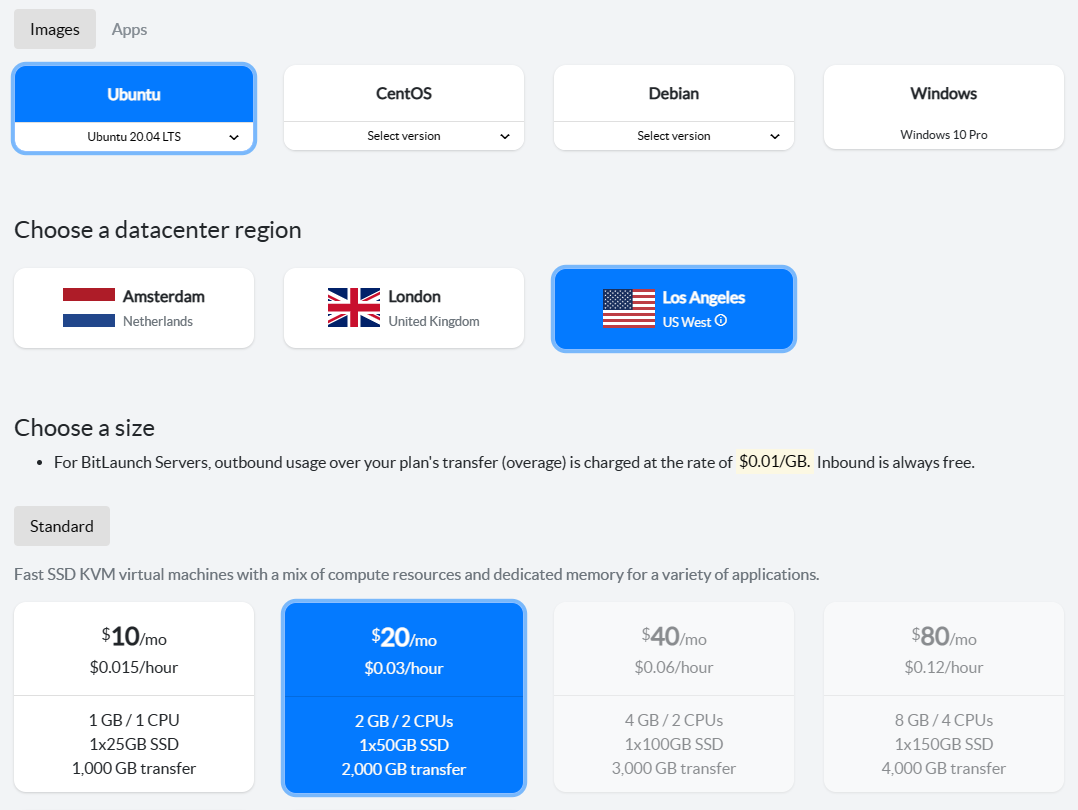
For purposes our purposes, this BitLaunch server hosted in Los Angeles will do nicely. It has 2GB of RAM and 2,000 GB of transfer. The higher storage space, the more information you'll be able to share with other nodes on the network, but the higher the cost.
After you have chosen your server, choose an SSH key to login with and give the server a suitable name. For more information on SSH keys, please see our SSH key guide.
Step 2: Installing Bitcoin Core
Once you're logged into your server, we're going to install bitcoin core. Unfortunately, the Ubuntu PPA is not maintained, so we'll have to compile it from source. This requires installing Git:
sudo apt update
sudo apt install git
We can now clone our Bitcoin repository to the folder using Git:
git clone https://github.com/bitcoin/bitcoin.gitYou'll receive an output similar to below:
Cloning into 'bitcoin'...remote:
Enumerating objects: 8, done.
remote: Counting objects: 100% (8/8), done.
remote: Compressing objects: 100% (7/7), done.
^Cceiving objects:  35% (65526/187217), 39.62 MiB | 13.20 MiB/s
Now we're going to prepare for our Bitcoin install by installing some pre-requisites:
First, the universe repository, which contains some compiling tools we'll require:
sudo add-apt-repository universeAnd now for our other pre-requisites:
sudo apt-get install build-essential autoconf libtool pkg-config libboost-all-dev libssl-dev libevent-dev doxygen libzmq3-dev libdb++-dev libsqlite3-devThough it's very outdated at this point and will be phased out soon, for now we also need to install BerkleyDB. We can do so through a script in our bitcoin folder that will automatically download and compile it:
./contrib/install_db4.sh `pwd`With that done, we can run the autogen script in our newly cloned bitcoin folder to further prepare:
./autogen.shNow let's do some final preparation, changing som options to disable the GUI and tell the compliler where to use Berkley DB:
export BDB_PREFIX="$HOME/bitcoin/db4"
./configure BDB_LIBS="-L${BDB_PREFIX}/lib -ldb_cxx-4.8" BDB_CFLAGS="-I${BDB_PREFIX}/include" --with-gui=no
Once the step is complete, we can finally compile and install our Ubuntu bitcoin core. The make command will take a while, I'm afraid. Depending on your VPS specs, it could be half an hour or longer, so you way want to go and do something else for a while.
make
sudo make install
We can now reduce storage requirements by only storing the most recent blocks. You can decide on how much space you would like to dedicate to blockchain storage. Higher values merely ensure that your node will not shut down upon blockchain reorganizations of more than 2 days - which are unlikely to happen in practice. In future releases of Bitcoin core, a higher value may also help the network as a whole because stored blocks could be served to other nodes.
To do this, we need to add a configuration file in $HOME/.bitcoin/ called bitcoin.conf:
mkdir .bitcoin
touch .bitcoin/bitcoin.conf
sudo nano .bitcoin/bitcoin.conf
In the nano window, paste:
prune=<amount_of_mb_to_use>Be sure to set the amount of MB to at least 550, as that is the minumum. (a value of 0 disables pruning). We recommend setting this to 60% of your disk space, but it's entirely up to you. You can press Ctrl + O to save and Ctrl + X to exit.
(Optional) Configure Bitcoin Core to use Tor
Running Ubuntu's Bitcoin Core install over Tor isn't strictly necessary, but if you want to support the Tor ecosystem it is an option. We can create a Bitcoin Core onion service to increase the number of available onion nodes. Just bear in mind that there's some evidence to suggest that this can create new attack vectors.
First, let's install and start Tor:
sudo apt install tor
sudo systemctl enable tor
sudo systemctl start tor
Now we need to make sure the following lines are in our tor config file:
ControlPort 9051
CookieAuthentication 1
CookieAuthFileGroupReadable 1
Edit your torcc file, which should be in /usr/share/tor/tor-service-defaults-torrc
sudo nano /usr/share/tor/tor-service-defaults-torrcAdd any of the lines above that are missing, then press Ctrl + O to save and Ctrl + X to exit. If you had to modify the config, be sure to restart tor:
sudo systemctl restart torFinally, we need to add the user you created to run bitcoin core to the tor group so that bitcoind has access to Tor's authentication:
sudo usermod -a -G debian-tor bitcoincoreuserRestart your server with sudo reboot.
Starting your bitcoin node
Run a bitcoin node with the following command:
bitcoind -daemonAlternatively, if you're using Tor, you can use the following:
bitcoind -daemon -debug=torThe BitNodes project provides an online tool to let you test whether your node accepts inbound connections.
Visit the bitnodes page and scroll down to the tool.

Enter your server's IP into the box and leave the port untouched.

A green box should appear to show that our server is working and can receive incoming connections from other nodes.
(Optional) Starting Bitcoin Core on reboot
Sometimes servers need to be restarted. It would be useful for us to start bitcoin core automatically on server boot.
The easiest way to set this is to use crontab. Crontab is a linux utility which allows us to run processes at certain intervals or at events.
crontab -eThis will open up a file. Processes are read from this file by crontab and contains the schedule of cron entries to be run at specified times.
Scroll down to the bottom and add a new line containing the following:
@reboot bitcoind -daemonThat's it! Now bitcoind will run on boot when the server is restarted.
Conclusion
You are now running a Bitcoin node handling real transactions being made and are contributing to the future of Bitcoin.
Now that you have a Bitcoin node running, you may wish to further configure your node. Bitcoin.org has excellent documentation and guides on Bitcoin and Bitcoin nodes.