

Get BitLaunch and instantly provision a server to edit the CentOS DNS server config.
Changing DNS server configuration can be very important. A switch in DNS can aid a server or user’s privacy, fix resolution issues, or allow you to use a self-created DNS server so you have full control over the process.
Unfortunately, though, the process isn’t the same across all Linux distros, leading to some confusion. Today we’re going to be focusing on CentOS 7 DNS config, which differs quite a bit from Ubuntu but has less guidance available.
CentOS DNS config files are found conveniently in /etc/sysconfig/network-scripts/. Here you’ll also find options to configure your IP, gateway, and DNS server and will find information like the hardware address and UUID. You’ll need a couple of pre-requisites before we jump into the guide, which will focus on setup on a VPS:
- A CentOS VPS, preferably CentOS 7
- The VPS credentials, which should be found in your provider’s control panel
- PuTTy or another SSH client for VPS connection
- The nano text-editor or familiarity with vi
 BitLaunch
Edit a CentOS DNS Config
First, install nano with sudo yum nano| We’re going to be using it as a text editor in a tutorial, but you can replace “nano” with “vi” on each command if you’d prefer.
You can find general network configuration for a specific adapter with the command:
nano /etc/sysconfig/network-scripts/ifcfg-eth0
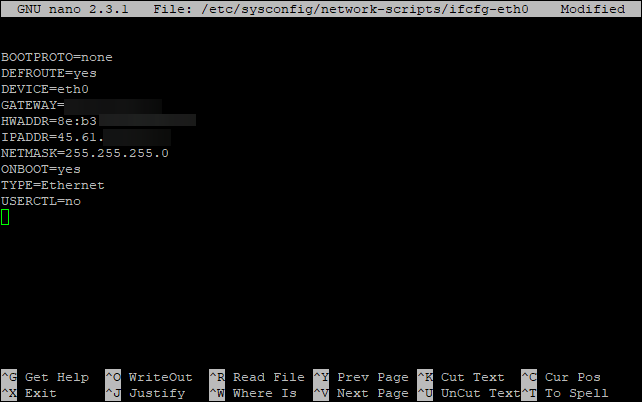
Simply edit the fields that are required, such as IPADR. You may have additional lines in your config file, with a DNS showing as:
DNS1=1.1.1.1DNS2=1.0.0.1
These values may cause issues if you edit your CentOS DNS config via resolv.conf. This is the recommended method that we’ll be covering later. Keeping them may result in changes to resolv.conf being reset to these values on a reboot. As a result, you may want to remove these lines. Additionally, some network interfaces use DHCP for activation which would also cause the DNS in resolv.conf to be overwritten. To prevent this, you can add the following to ifcfg-eth0:
PEERDNS=no
Once complete press Ctrl+O to write out the changes and Ctrl+X to exit nano, or Shift+zz to save and quit with vi.
We can now edit the CentOS DNS config with:
nano /etc/resolv.conf

Change the nameserver values to your preference, in our case to Cloudflare. Press Ctrl + O to save and Ctrl + X to exit nano or Shift+zz to save and exit in vi.
You can use a similar technique to edit the gateway independently. Type nano /etc/sysconfig/network and edit the gateway if it’s located there instead.
If your configuration files contain warnings about the modification of Cloud-init files, you may want to follow the steps here to disable Cloud-init’s network configuration capability.