

Apache is one of the most used web servers in the world, second perhaps only to Nginx. It's reliable and stable, with a long and fabled history, frequent updates, and a swathe of features. Most importantly, it's free and open source.
While less performant than Nginx, Apache makes up with its 60 official dynamically loadable modules, which can be loaded and unloaded at any point. Critically, it also has the ability to process dynamic content within the server, without needing to rely on external components.
This guide will cover how to install Apache web server on Ubuntu 20.04, as well as how to set up virtual hosts so you can host more than one domain on a single server.
Pre-requisites
First, let's talk about what you need before you start with the main setup. Thankfully, you'll just need a basic VPS server setup: a non-root user with sudo privileges and a basic firewall configured to block the ports you won't need.
It is helpful if you also point your domain to your server using an A record. You can find a guide for this here.
Of course, you should also update your server and package index with:
sudo apt update
sudo apt upgrade
Everything else, we'll handle throughout the course of this tutorial.
How to install Apache
Though the main subject of this guide, this is the easy part. All you need to do to install the apache2 package is run the following:
sudo apt install apache2
That's it. After pressing y, Apache and all of its dependencies will be installed. Quite seamless, but we also need to adjust the firewall, test that everything is working, and set up any virtual hosts we need.
Configuring your firewall for Apache
You need to allow traffic through the requisite Apache web server ports for it to function properly. Thankfully, apache makes this quite easy by registering these ports with the ufw firewall on installation. This provides us with several profiles that we can easily turn on and off: Apache, Apache Full, and Apache Secure.
"Apache" opens port 80 for unencrypted web traffic, Full opens both port 80 and port 443 (SSL/encrypted traffic), and Apache Secure opens just port 443.
Choose the one that's most relevant to you and enable it. We haven't set up SSL yet, so for now we're going to use 'Apache'. It's good security practice to only open the ports that you need.
sudo ufw allow 'Apache'
If you now type sudo ufw status, you'll see that Apache is on the list.
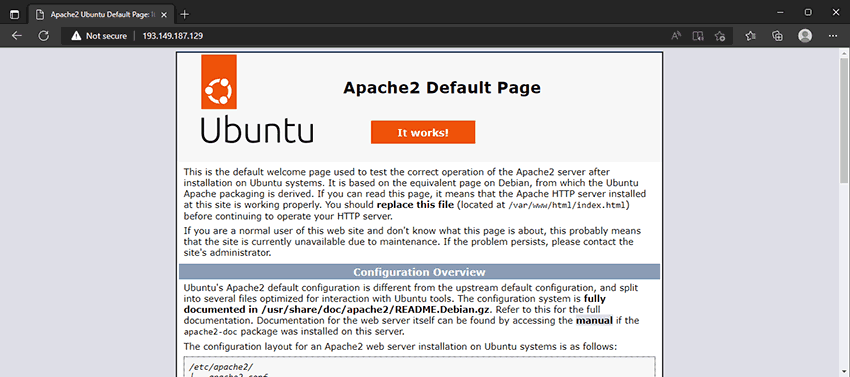
You can check everything is working properly by visiting your server IP in the browser of your local PC. For example:
How to set up Apache virtual hosts
If you plan to use your server to host more than one domain at any point in the future, it's a good idea to set up virtual hosts. If you're familiar with Nginx, this is the equivalent of server blocks.
Your server will come pre-configured with one server block and that block will serve content from /var/www/html. It's good practice to create a separate directory structure for each domain instead, such as /var/www/domainnameone and /var/www/domainnametwo. Your folders don't have to match the domain name exactly – the config file will do the heavy lifting – but it will be useful for identifying them later.
In this guide, we'll be using yourdomainname.info, but you should of course change this to your actual domain.
Creating the directory
The first step is creating a directory for your domain name using mkdir in /var/www/:
sudo mkdir /var/www/yourdomainname
It's important that you make sure this folder has the correct ownership and permissions before you continue. Failing to do so will lead to issues down the line and could represent a security flaw. You need to assign ownership to your user, and grant it the ability to read, write and execute, while denying write and execute privileges to other users.
sudo chown -R $USER:$USER /var/www/yourdomainname
sudo chmod -R 755 /var/www/yourdomainname
Configuring Apache virtual hosts
Now we can create our virtual host file, which tells Apache what domain it should resolve and which directory it should fetch the content from. We aren't doing anything complex here, so we can keep the config file short.
Create a config file in /etc/apache2/sites-available/ named after your domain:
sudo nano /etc/apache2/sites-available/yourdomainame.conf
You can paste this config in by right-clicking, replacing yourdomainname with your actual domain wherever it is referenced:
<VirtualHost *:80>
    ServerAdmin webmaster@localhost
    ServerName yourdomainname.net
    ServerAlias www.yourdomainname.net
    DocumentRoot /var/www/yourdomainname
    ErrorLog ${APACHE_LOG_DIR}/error.log
    CustomLog ${APACHE_LOG_DIR}/access.log combined
     <IfModule mod_dir.c>
        DirectoryIndex index.php index.pl index.cgi index.html index.xhtml index.htm
    </IfModule>
</VirtualHost>
Save the file with Ctrl + O, followed by Ctrl + X.
Testing your Apache virtual host with a dummy page
Before we activate the virtual host, let's make a demo index page in our document root that we can use to ensure it is working correctly:
sudo nano /var/www/yourdomainname/index.html
You can put whatever you like on the page, so long as you can identify that it's for your specific server block. Here's an example:
<html>
    <head>
        <title> This is yourdomainname!</title>
    </head>
    <body>
        <h1> If you're seeing this, your virtual server block is working.</h1>
        <h3> You can now replace this with your actual website/service</h3>
    </body>
</html>
Save the file and close it. You can now enable your config file and disable the default site:
sudo a2ensite yourdomainname.conf
sudo a2dissite 000-default.conf
Before we restart Apache to apply the changes, you can test your config file for any errors:
sudo apache2ctl configtest
If you receive the Syntax OK output, you're good to go. Restart Apache using:
sudo systemctl restart apache2
Once the restart is complete, visit your domain in your browser and check if your index page is served.