

Sign up for BitLaunch and perform your Algo VPN setup in minutes.
We started BitLaunch because we believe that privacy is a fundamental human right. Though the technical landscape has evolved dramatically since the United Nations' ruled on privacy in 1945, the philosophy behind it remains the same – you can't truly have autonomy if everything you do is scrutinized without your permission.
One way to protect your privacy online is through a bitcoin Virtual Private Server (VPS). If you buy a VPS with bitcoin, you can keep your transactions more private, while tunneling your traffic through an encryption protocol helps prevent and anonymize data collection. Unfortunately, though there are hundreds of VPN providers, recent high-profile hacks and the exposure of outright lies when it comes to 'no log' policies have put trust at an all-time low.
Today, we're going to show you how to install Algo VPN on a bitcoin VPS server so you only have to trust yourself. This open-source personal VPN software was designed by Trail of Bits to make the deployment process simple yet secure.
Algo VPN makes use of WireGuard, a new VPN protocol that has been praised for its security and efficiency. It's seen by many as an up and coming replacement to the sluggish OpenVPN, which is currently the most popular solution.
Though BitLaunch does offer a one-click setup of WireGuard that tends to have better performance, manual setup via AlgoVPN can provide more transparency and customizability.
Pre-requisites
First things first, this tutorial will focus on how to install Algo VPN on an Ubuntu 20.04 VPS server. If you have a local install you should still be able to follow along just fine, but remember that commands may differ slightly if you're using a different version of Linux or another OS entirely.
You'll also need the following:
- A VPS server or local install of Ubuntu 20.04
- Your VPS login details, including username and password
- A local PC to connect to your personal VPN with
It's also important to ensure your VPS is secure before you start. If your underlying server is compromized, that can naturally affect your anonymity.
How to Make Your Own VPN with Algo VPN
Before we get started with this bitcoin Algo setup, it's a good idea to update your OS and install python and ansible, which it will require to function correctly. Run:
sudo apt-get -y update

sudo apt-get -y upgrade

sudo apt-install -y python3-virtualenv
Wait for the install to finish and grab the latest Algo VPN install from GitHub with:
git clone https://github.com/trailofbits/algo.git
We can now prepare for the installation further by entering the following:
python3 -m virtualenv --python=/usr/bin/python3 .env
source .env/bin/activate
python3 -m pip install -U pip virtualenv
python3 -m pip install -r requirements.txt
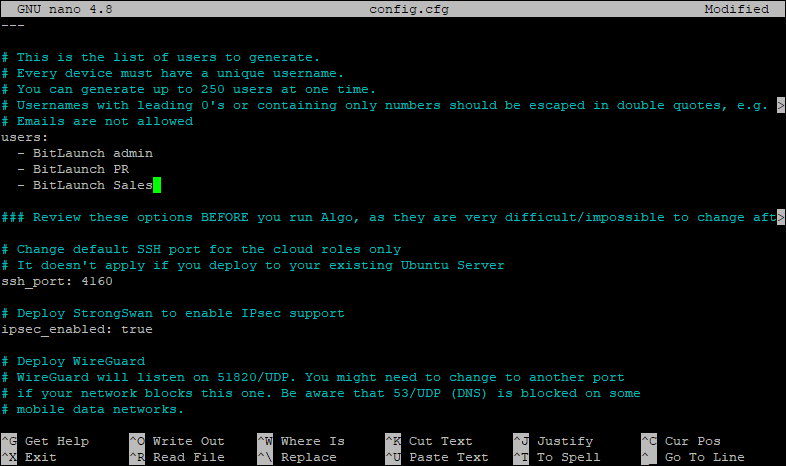
With that done, we can set up usernames for those who'll be using the VPN by editing config.cfg in the /algo directory:
nano config.cfg
By default, your config file will have three users: - phone, - laptop, and - desktop. You can change this to match your users or add additional users with the same formatting to suit your preferences. Make sure you add as many users here as possible, even if they're just placeholders, as it's less secure to add them later.
While you're here, you may want to enable the unattended_reboot option for additional security. You can find this somewhere in the middle of the config file. Once you're done, it should look like this:
unattended_reboot:
  enabled: true
  time: 06:00
You can change the "time" value to whatever makes sense to you. There are dozens of other options in the config file that may or may not apply to you, so it's worth having a quick look through before you move on to deployment. If you're using Algo VPN locally, for example, you can set the DNS servers to your local IP address.
Once you're done, press Ctrl + O to save and Ctrl + X to exit.
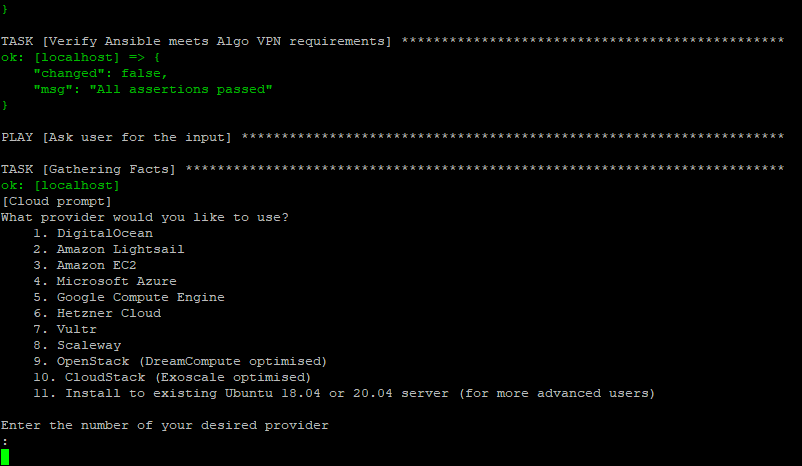
With all that done, we can finally show you how to install Algo VPN. Navigate to your Algo VPN root directory /algo, and run the command:
./algo
The installer will prompt you to choose a provider, with various popular options available. We're going to assume you're using a BitLaunch VPS, in which case you should type the number that corresponds with Install to existing Ubuntu 18.04 or 20.04 server and press Enter.
Algo will ask if you want to enable connect on demand on iPhone by default. We recommend replying y if it matches your use case, but be aware that you may still have to manually select it after installing the VPN on an iPhone anyway. You can then type the name of trusted networks in the next step.
Important: The setup now enquires Do you want to retain the keys (PKI)? if you require the ability to add users to the config after the setup is complete, you must reply y. However, this is less secure, so it's better to add them during the initial config process if you can.
You can now decide if you want your personal VPN to block ads as well as enhance your privacy. It's up to you if you'd rather block ads on the VPN-level or configure ad blocking separately on each device. Though DNS ad blocking simplifies the process, it's also harder to turn off if you do want to view an ad on a specific website while connected.
Choose whether you want each user to have their own account for SSH tunelling by typing y or N.

Your Personal VPN will now ask for an IP address.
After the Enter the IP address of your server: (or use localhost for local installation): prompt, type localhost.
After Enter the public IP address or domain name of your server: (IMPORTANT! This is used to verify the certificate) you should enter the IP address of your VPS server, which you can find in your BitLaunch or provider's control panel.

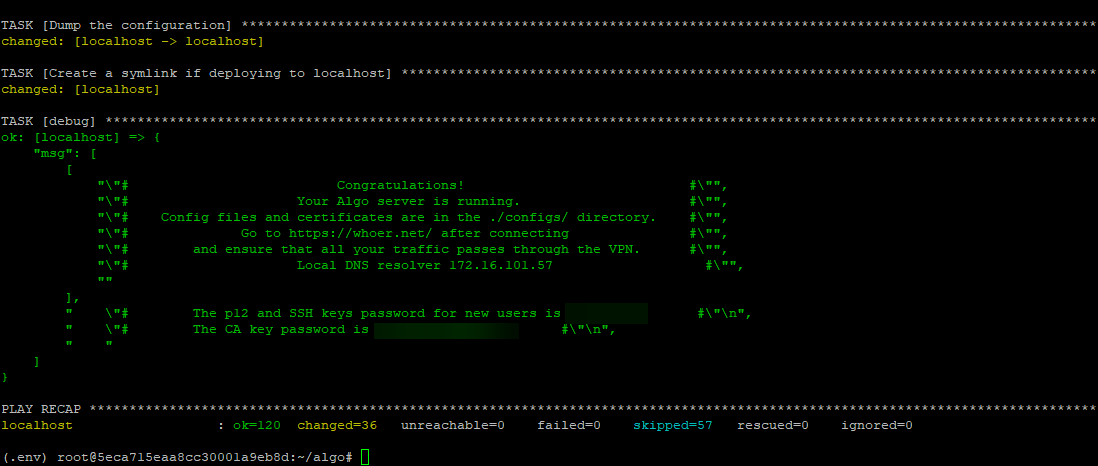
You can now wait for the Algo VPN installation to complete. This can take a little while depending on your VM's specifications and other factors. Once complete, it will surface a 'congratulations' message and the P12 and SSH keys password for new users. Make sure you copy the keys down so you can use them later.
How to Install Algo VPN on Clients
With the installation complete, the only thing left to do is to configure your VPN clients – the devices that will be connecting to your server. The process is slightly different depending on the OS, but usually involves downloading the client on macOS, Android, iOS, or Windows.
Adding your VPN details also varies. On mobile devices, it's quite simple. Search the algo/configs/localhost/wireguard for a file PNG image with ls. Download the QR code image via SFTP and scan it on your iOS or Android phone.
If you're using WireGuard on Windows or macOS, you'll want to point it to the .conf file in the wireguard subdirectory via the Import tunnel(s) from file... button. You can retrieve your file via SFTP. Once you're done, press Activate to turn on the VPN.
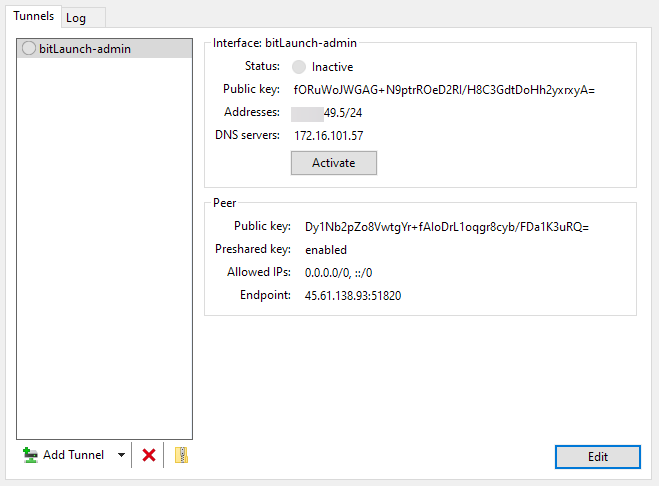
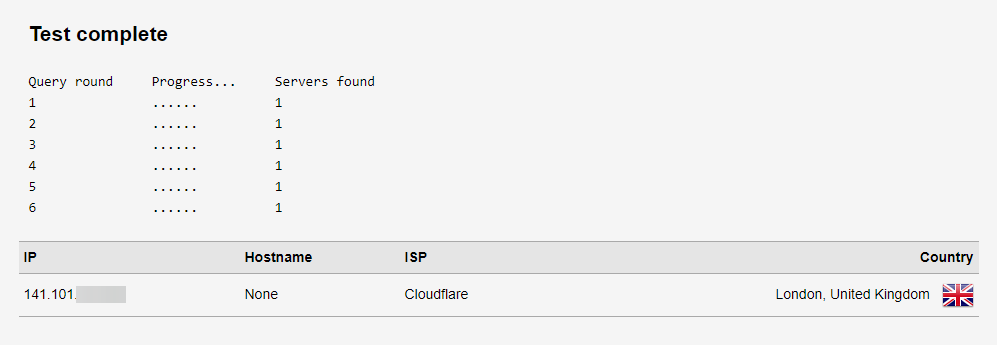
Before you do anything sensitive, you should enable the kill switch in your WireGuard settings and check that your VPS is working correctly on each device. Go to DNSleaktest.com and run the extended test. If only one IP address is returned, you know you don't have a DNS leak.
If you have a DNS leak on Windows, you may be able to fix it by running the following in CMD:
netsh teredo set state disabled
Now, for a second and more general test, visit ipleak.net. Pay attention to the 'Web RTC detection' section and make sure your true IP address isn't leaking. If it is, install the WebRTC Network Limiter extension on Chrome or set media.peerconnection.enabled to false in Firefox's about:config page.
You're now ready to use your personal Algo VPN as you would any other VPN. We recommend periodically destroying your BitLaunch server and creating a new one to change your IP address.